TABLES
By Tables we mean lines and columns, which allow us to structure our content.
Chapter Navigation:
Creating a Table
Select Common in the menu bar
then click on the Table icon, this sends us to the configuration menu
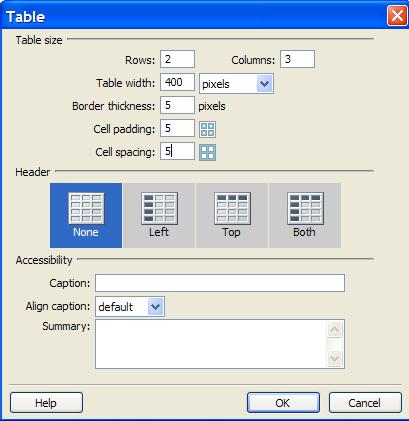
Now we enter our parameters:
- Table size
- Number of lines and columns
- Width of the table in % or in pixels (max=100% or 600 Pixel)
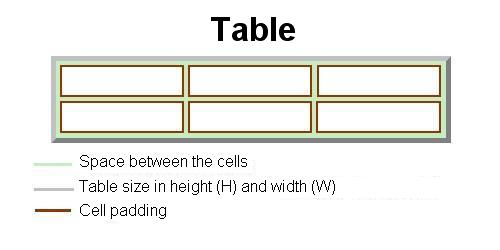
- Width of border that contours the table
- Inside padding of cells which allows us to reduce the cell size
- Space between the cells so that we can frame the cells
Now select None under Header
To give your table a title, just fill it in the caption space.
Properties of a Table
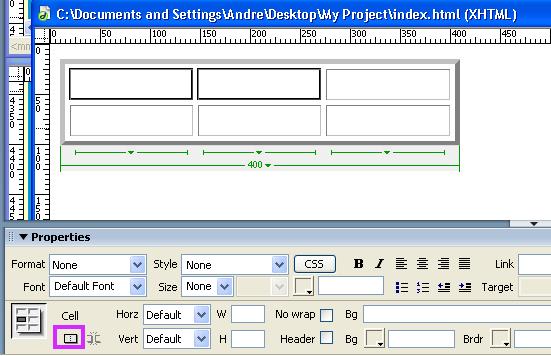
If you look at the bottom left of the page, you will notice words and letters between the arrows
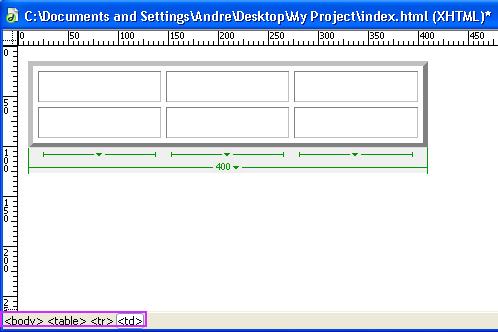
These indicate your location on the table. Try clicking on the words between the arrows, and see the behaviour of the table. Here is what you get:
By doing this, you can see that the properties window changes according to the tag you selected.
If the shape or size of your table is not right, you can change it in the Properties window (see the properties window page).
That is where you can change the size of the cells with (H) and (W) by changing their numerical values.
Dimension of a Table
In the picture above, you will notice a (W) of 400 pixels, which means that it will be neither bigger nor smaller, and a (H) which is not indicated (The table will take on a default value)
If you change the (W) value to 100%, then the table will automatically fill the window of your browser.
Let's select a line and a column now whose (W) and (H) are empty.
By inserting your sizes, you will determine its dimensions.
You have to be careful to respect the size of your table. The sum of the cells must be of similar size to the width and height of the table (the indicator suggests values in brackets - these values are the ones that will be remembered)
By keeping the values we had in the initial creation of the table (Border thickness, padding and cell spacing are all 5 for this example)
If we give the cells a (W) of 133 each, then we will notice 111 in brackets.
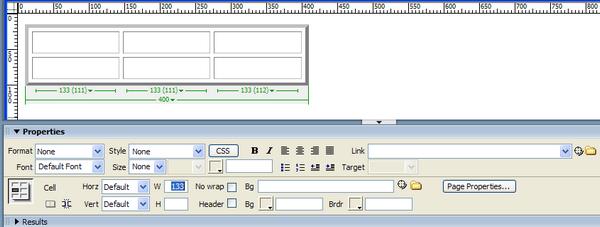
Here is why.
So if we add up 1.) and 2.) and 3.) or 16 + 30 + 20 = 66
You will remember the number in brackets (111) per cell.
If all 3 cell were 111, we would end up with 333 + 66 = 399. But we have a total width of 400, which is why Dreamweaver proposes a width of 112 for the last cell.
NOTE: if you leave the fields empty, then Dreamweaver will assign default values that are essentially equal to 0 for the border and padding, and 2 for cell spacing.
If the width of your table is in % (it will fill the browser), then you must give at least one cell a value in %.
Example 1 - Two columns of fixed width and one of variable width
Example 2 - Three identical columns
NOTE: Make sure that the total does not exceed 100%, or the total width of your page
Merging the cells
To merge cells together to make a bigger one, just drag your mouse with the left click down over the cells you wish to merge.
Then go to the Properties window, and select the merge selected cells using span
That's it.
One more thing, to take away the grouping of cells, click on the icon immediately to the right.
- is the active cell (where your flashing cursor is)
- selects the line that has the active cell
- selects the table in question
-
- Border width: 2 x thickness + 2 x (number of cells). Here 2x5 + 2x3 = 16
- Padding: 2 x thickness x (Nbr of cells). Here 2x5x3 = 30
- Spacing between cells: thickness x (Nbr of cells + 1). Here 5x(3+1) = 20
- Col 1 = 100 pixel (Fixed width)
- Col 2 = 100% (Width will vary with size of browser)
- Col 3 = 100 pixel (Fixed width)
- Col 1 = 33% (Variable width)
- Col 2 = 33% (Variable width)
- Col 3 = 33 % (Variable width)
selects the whole page